Monday, 10 July 2017

Dealing with exceptions occured while datanucleus enhancement process in Google App Engine+Java+JDO2+Maven style project.

This article is very specific to Google app engine + java + JDO2 + Maven stack legacy application. I am going to talk about few exceptions facing while running/deploying the application of this type. You may skip if this is not applicable scenario to you.  But if you arrived at this page searching for the exceptions facing related to datanucleus enhancement for app engine project than please go ahead.

Why I have started facing the issue ?? 

Previously I was using IDE(Eclipse/Intellij) feature to create Google App Engine project. In this case I was able to run and deploy the code perfectly fine as the class enhancement process was taken care by IDE plugin if you create Google App Engine project.Now due to some deployment and build requirement I want to convert that project to Maven project so that I can build/run/deploy the project without depending on the IDE. I have converted traditional app engine project to traditional maven project and tried running/deploying the project. When project was deployed and I tried to access the project I was getting below exception for one of my Entity/data class:

1) Persistent class "Class com.ali.data.jdo.Student does not seem to have been enhanced.  You may want to rerun the enhancer and check for errors in the output." has no table in the database, but the operation requires it. Please check the specification of the MetaData for this class.

So this one is clear that you need to perform enhancement on your Data/Entity classes. Below link has more details why byte code enhancement needed after compilation and what are different ways to achieve that.
http://www.datanucleus.org/products/datanucleus/jdo/enhancer.html

Lets say you have selected one of the way from the above URL for enhancement and you are still facing one of the below exception in that process.

2) "org.datanucleus.enhancer" is already registered. Ensure you dont have multiple JAR versions of the same plugin in the classpath. The URL 
"file:/C:/Users/<username>/.gradle/caches/modules-2/files-2.1/org.datanucleus/datanucleus-enhancer/3.1.1/b141c67d55cc19f14639f091b84e692e2198dc50/datanucleus-enhancer-3.1.1.jar" 
is already registered, and you are trying to register an identical plugin located at URL 
"file:/C:/Users/<username>/.gradle/appengine-sdk/appengine-java-sdk-1.9.3/lib/opt/tools/datanucleus

This error will come due to multiple datanucleus-core.jar file presence in classpath. You need to remove it from one place depending on the way you are compiling the classes.

3) datanucleus enhancer failing command too long error
commandline too long) when starting the enhancer in forked mode

I got this error while I was using Maven plugin way to enhance the classes.
http://www.datanucleus.org/servlet/jira/browse/NUCMAVEN-47
http://www.datanucleus.org/servlet/jira/browse/NUCMAVEN-44
Here you can see they are claiming that it has been fixed in the newer version of the plugin so I tried it and got rid from this error at least. After that I have started getting below exception.


4) org.datanucleus.exceptions.NucleusException: Error reading the Meta-Data input "Content is not allowed in prolog.
I am not able to find the solution for this exception but at least I understood that it is coming because while enhancing it is trying to read some other format files (e.g: .xml,.md,.properties etc) from classpath. So try to provide path/packages list in plugin or by some other way to instruct which classes to enhance.

5) You have selected to use ClassEnhancer "ASM" yet the JAR for that enhancer does not seem to be in the CLASSPATH!
This one is very nasty and believe me even though you will do all the possible things to fix this stubborn bug it will not leave you. The datanucleous enhancer needs ASM jar in the classpath. Add the right version (may be 5) and see if you can get rid of it. Also check for presence of older version ASM jar in classpath and remove it. I googled a lot for this bug but nothing worked our for me. Comment down in case something will work for you than.


Final Hybrid Solution which I have derived for my requirement:

I have tried Maven datanucleous plugin way but it was not working for me.

Finally I have decided to go with "Manual invocation at the command line"

But as I said earlier I want to automate the build/run/deploy process automated.  So I achieved that by below 2 steps:

1) Created a script containing the list of commands to perform manual enhancement on the selected data classes.

As I am on windows platform I have decided to put my manual enhancement java commands in one of the .bat file which I will integrate in maven build flow later in the step 2.

My enhance.bat script will look like:
 java -cp target\hello-world-1.0\WEB-INF\classes;scripts\required-lib\* org.datanucleus.enhancer.DataNucleusEnhancer target\hello-world-1.0\WEB-INF\classes\com\ali\data\jdo\*.class  
 java -cp target\hello-world-1.0\WEB-INF\classes;scripts\required-lib\* org.datanucleus.enhancer.DataNucleusEnhancer target\hello-world-1.0\WEB-INF\classes\com\ali\common\jdo\*.class  

Here we are trying to run the DataNucleusEnhancer class on some selected compiled packges.


  • target\hello-world-1.0\WEB-INF\classes  : The intermediate classes generated by maven which is must to include in classpath to run this command
  • scripts\required-lib\* : I have created this folder structure in the root directory of project and put all the dependency jars you have used for project in this folder and also add "datanucleus-enhancer-1.1.4" jar file which has the main class DataNucleusEnhancer. 
  • org.datanucleus.enhancer.DataNucleusEnhancer : The main class which is entry point for performing the enhancement.
  • target\hello-world-1.0\WEB-INF\classes\com\ali\data\jdo\*.class : The list of packages containing the data/entity classes which you want to enhance.


2) Added a plugin in maven pom.xml file which calls that script in "process-classes" phase which is after the compilation and class files generated.

Plugin:

This is how I am calling the .bat script created in the first step from maven.
 <plugin>  
         <artifactId>exec-maven-plugin</artifactId>  
         <groupId>org.codehaus.mojo</groupId>  
         <executions>  
           <execution>  
             <id>enhancer</id>  
             <phase>process-classes</phase>  
             <goals>  
               <goal>exec</goal>  
             </goals>  
             <configuration>  
               <executable>${project.basedir}/scripts/enhance.bat</executable>  
             </configuration>  
           </execution>  
         </executions>  
       </plugin>  

This will process the compiled classes and then prepare WAR file from the enhanced classes.

For JDO2+ Google App Engine combination you must use below versioned jar files only:
asm-5.0.4.jar
datanucleus-core-1.1.5.jar
datanucleus-enhancer-1.1.4.jar
datanucleus-jpa-1.1.5.jar
datanucleus-appengine-1.0.10.jar
jdo2-api-2.3-eb.jar


Let me know for any queries or questions. Comment down in case you are stuck in similar scenario and want a detailed solution for the approach I have used.

Saturday, 14 January 2017

Java interview question:Pass by value or Pass by reference ?

By looking at the title you may think this is just another article related to java object reference management. But in this article I want to share my own experience which was very surprising for me also. I have asked the same question to many experienced people in interview but surprisingly 7 out of 10 people gave wrong answer for this very basic but important concept of core java.


Below is the code example I used to ask to people:
 class A {  
   private int number;  
   int getNumber() {  
     return number;  
   }  
   void setNumber(int number) {  
     this.number = number;  
   }  
 }  
   
 public class App {  
   public static void main(String... arg) {  
     A obj = new A();  
     obj.setNumber(10);  
     function1(obj);  
     System.out.println(obj.getNumber());  
   }  
   
   private static void function1(A a) {  
     a.setNumber(12);  
     a = null;  
   }  
 }  


Try to guess the answer before scrolling down........


7 out of 10 people told me that it will throw null pointer exception , which is incorrect answer.

Actual output:


Let me explain what is happening here:

in the main method First we have created object of type A and setting value 10 to that object.


After that we are calling function1 and passing "obj" as method argument, which is received by reference "a" .Below is the memory state:


After that we are setting value 12 to number via reference "a":


Than we are assigning null to reference "a" :


Here is the tricky part , After this the control will be returned to main method and we are using "obj" for printing value of number. "obj" is not null and contains modified value 12.

Key points to remember:
1) Java always pass method arguments by value only, yes you read it right, it is always always always always pass by value.
2) Java handles objects using their references we have created.
3) Two or more references can point to same object.


In this case the object reference value is copied and new reference is created for function1. But still it is pass by value only , never pass by reference. The object reference is copied not the actual object , as reference is the handle to access the object in java.

Why people trapped for pass by reference answer ??

Here you can see the value changed to 12 in function1 is visible in main method. This effect is the biggest reason why people think it is pass by reference. The value is changed because both the references pointing to same memory object in memory.


Now lets modify the function1 little bit and see what will happen:
 private static void function1(A a) {  
     a.setNumber(12);  
     a = null;  
     System.out.println(a.getNumber());  
   }  

Above program will give NullPointerException. Because the reference "a" is null now and we are trying to access null reference.


Next I am showing you similar example but this time it is for primitive type argument passing :
 public class App {  
   public static void main(String... arg) {  
     int a = 10;  
     function1(a);  
     System.out.println(a);  
   }  
   
   private static void function1(int b) {  
     b = 12;  
   }  
 }  

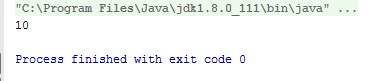
Here the outcome will be :


The reason here is also same  , as method argument is pass by value only, the value of "a" is copied to "b" only and here it is primitive type and they are having different memory location for both the variable, any change in "b" is not effective for "a".

One last exercise for you related to wrapper class:
 public class App {  
   public static void main(String... arg) {  
     Integer a = 10;  
     function1(a);  
     System.out.println(a);  
   }  
   
   private static void function1(Integer b) {  
     b = 12;  
   
   }  
 }  


That's it for now...

Please post your comments and doubts!!!

Saturday, 17 December 2016

Part3: Build your own monitoring system using Riemann,Graphite,Collectd.

In previous article , part2, we have discussed about Graphite integration with riemann. In this article I will give overview of Collectd and some advanced stream processing options in riemann.

Collectd Overview

Collectd is a daemon and gathers metrics from various sources, e.g. the operating system, applications, logfiles and external devices, and stores this information or makes it available over the network.

Collectd itself is a big item to discuss and there are lot of things you can achieve with it.But here I will discuss only the area of our interest. What we will do is we will tell collectd to send the metrics collected by it to the graphite server!!!!!!!!! pretty amazing right???

Collectd installation and Plugin concept

Download collectd from this link according to the flavour of your Linux distribution.

For my case steps are:

1) sudo apt-get install collectd 
2) service start collectd

Done. Your collectd is installed and running.
Now lets take a look at very important config file related to collectd.
In my case it is located at /etc/collectd/collectd.conf
If you will open this file you can observer some list of plugins and configuration related to each plugin.

In collectd we have concept of plugins. We need different types of plugin to fetch different types of metrics and doing monitoring activity.
  
Above is plugin to fetch cpu related info of the system on which collectd is running. We will se outcome of this plugin very soon on Graphite.

Now you must have figured out that if we want collectd to forward this metrics to graphite than we must be having some plugin for that. Ohhhh yeah!!!! your guess is right. We do have a plugin for it.


two things we are doing here. First we are defining write_graphite plugin and second we are providing config for that plugin. The host name of graphite server is localhost as it is installed in same VM. All collectd related graphs will be rendered in graphite under prefix name we have set here. After adding graphite related plugin save the file and restart the collectd service.


Below is the outcome on Graphite dashboard for collectd:


Here I am stopping my discussion for collectd and moving towards last and important section, riemann stream processing.

Riemann stream processing examples

I will show you few stream processing examples in riemann.

1) Send email based on service status

Below is the configuration for sending mail from Gmail. You can do similar things for your SMTP.
Add this configuration in your riemann.config file and restart riemann.
 (def email (mailer {:host "smtp.gmail.com"  
             :port 465  
             :ssl true  
             :tls true  
             :user "myaccout@gmail.com"  
             :pass "mypassword"  
             :from "myaccout@gmail.com"}))  
 (streams  
   (where (state "critical")  
    (email "xyz@gmail.com")))  

two things we are doing here.
1) Declaring email related configuration. This could be vary depending on the SMTP provider.
2) I am defining one stream rule such that if state of any service is critical than send out mail to some email id.

Lets send "critical" state from java code for our "fridge" service created in part1.
 RiemannClient c = RiemannClient.tcp("localhost", 5555);  
     c.connect();  
     c.event().  
         service("fridge").  
         state("critical").  
         metric(10).  
         tags("appliance", "cold").  
         send().  
         deref(5000, java.util.concurrent.TimeUnit.MILLISECONDS);  

Lets see the received mail in xyz@gmail.com


This the default mail template used by riemann. You can change the format and details of email. I am leaving that part for your assignment.


2) Email the exception 
Add  below stream processing rule in your riemann.config file.
 (streams  
   (where (service "exception-alert")  
    (email "xyz@gmail.com")))  

Lets send some exception from java code:
 RiemannClient c = RiemannClient.tcp("localhost", 5555);  
     c.connect();  
     try {  
       // some business logic  
       throw new NullPointerException("NullPointer exception in your system..Somebody will be in trouble!!! ");  
     } catch (Exception e) {  
       c.event().  
           service("exception-alert").  
           state(e.getLocalizedMessage()). // you can send full stacktrace also  
           tags("error", "exception", "failure").  
           send().  
           deref(5000, java.util.concurrent.TimeUnit.MILLISECONDS);  
     }  

Lets see the received mail in xyz@gmail.com:


what else you can do ?
1) Send email alert if some VM/service is down.
2) Filter and process stream depending on hostname,service name, metric value, service state, tag values etc... and perform some actions based on that.
3) You can set threshold values for metrics received and perform some actions if threshold value is crossed. e.g: VM cpu is very high, above 95%, some business specific constraint value is violated...

These are just few examples I have given. Check out the link I have posted at the end of article for riemann.

Below is the updated architecture diagram:


Collectd daemon will send all system related generic metrics to Graphite.


In this three series of article I have just scratched the surface for this area. There are thousand different things and possibilities you can think and achieve with this monitoring framework.

Below are the useful links for different types of config,plugins and integration of other systems you can do with riemann,Graphite and collectd. I have just explained 3% of entire.Rest things you can add as per your need and use case of system.

Riemann:
http://riemann.io/clients.html
http://riemann.io/howto.html

Graphite:
https://graphiteapp.org/#integrations
http://graphite.readthedocs.io/en/latest/tools.html
http://grafana.org/

Collectd:
https://collectd.org/
https://collectd.org/wiki/index.php/Plugin

This is the last article of this series.
Hope you have enjoyed!!!

Please post your comments and doubts!!!

Part2: Build your own monitoring system using Riemann,Graphite,Collectd.

In previous article , part1, we have discussed about riemann installation and basic event sending from java application. In this article we will see riemann integration with Graphite. First lets discuss about why we need Graphite.

1) In Riemann the events are stored only till the TTL-time to live- value , we need something to store the events for longer term so that in future we can look at the statistics and get idea about system behaviour at the time of failure or error scenarios.
2) Riemann is stateless system and the riemann-dash board is also stateless. There are ways to store the definition of created dashboards but still they will show live data only.

While graphite has 2 great capabilities.
1)Storage
2)Easy and powerful dashboard UI.

Lets start with Graphite installation.

Graphite Installation

In this link you can see 4 different way of installing graphite and other component needed for it.
I am using 4th way : Installing From Synthesize

Synthesize provides script which automates installation of all necessary dependency and components needed for Graphite. But Synthesize installation method available for Ubuntu 14.04 version only. If you are using some other version and flavour of Linux than you should go with other way.

Installation steps for my case:
$ cd synthesize
$ sudo ./install
that's it !! Done!!

open Graphite dashboard in browser:


Lets integrate graphite with riemann.

Riemann Graphite Integration

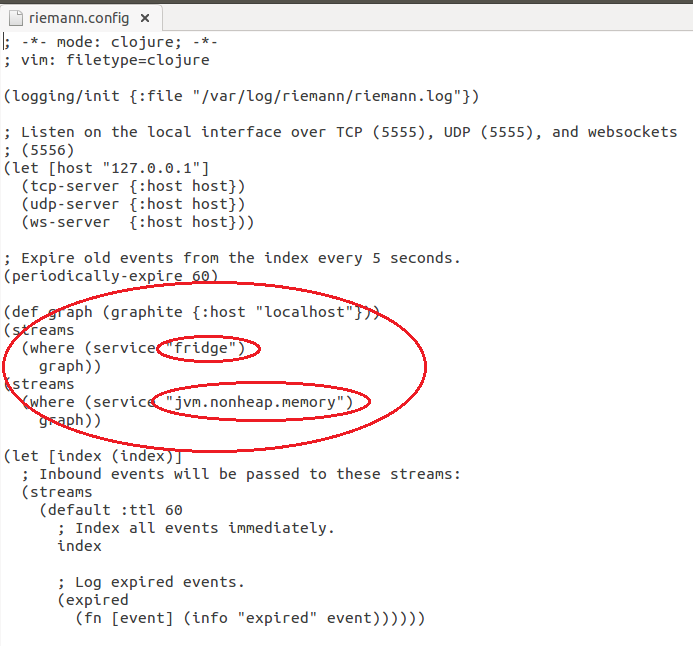
Open riemann.config file. In my case it is located at /etc/riemann/riemann.config


The red part I have highlighted is the newly added config for Graphite.
First I have provided location of Graphite VM. In my case it is the same machine so I am using localhost.
The next thing is stream processing rules.You can specify which services you want to render on Graphite. Here I am declaring both "fridge" and "jvm.nonheap.memory" service to render on Graphite dashboard. We have created this services in part1.


As you can see Graphite has capabilities to store the metrics so you can configure time/date range. One more thing you should observe is Graphite creates new folder structure for each "." present in the service name. Here jvm.nonheap.memory folder structure you can see. So that you can organise and send your metrics accordingly.


What next you can do 

Grafana is the next thing you can add in your framework. In simple word Grafana is a dashboard which can operate upon the data stored in Graphite storage. So basically Graphite will be there but Grafana can use Graphite's data and provide much much better and advanced dashboard options.
Explore more on this from here : http://docs.grafana.org/

Below is the updated architecture diagram:


So riemann processes the events and pushes the metrics data associated with events to Graphite for storage. Garphite stores it and display it on the dashboard. Grafana can leverage the data present with Graphite for further rendering.

That's it for now...

part3 is my next article on this series.

Please post your comments and doubts!!!

Part1: Build your own monitoring system using Riemann,Graphite,Collectd.

In this 3 article series of build your own monitoring system for your application I will give basic idea about the different tools and technologies you can use and I will demonstrate how they communicate with each other. I will also explain "what will be the next step"  or "what else you can add in this monitoring framework".

The main components we will discuss are :
1)Riemann
2)Graphite
3)Collectd

I will also give overview for some surrounding tools and plugins that we can attach to the above main components.

For all this exercise I am using Ubuntu 14.04.5 LTS. You can use any other Linux distribution of your choice. I will show installation steps for Ubuntu , but for other Linux distribution, the steps are not much different and difficult. Many user guides are available on the internet. Windows users I am feeling sorry for you as Riemann and Graphite are not supported in windows as of now.

Lets start with Riemann.

Riemann

As per http://riemann.io/ ,what is riemann : A network event stream processing system, in Clojure

This is the theory. Let me break down the words and explain you as a developer point of view.

Network: Some server accessible on network (true... when you start riemann, it starts a server port and listen on that port for events , what is event ???)

Event : Some event in your application which has some data, some metrics associated with it, which can be stored and can be analysed.
E.g: User response time for some DB related operation, time to complete some ETL process , Number of times some operation performed ,Some memory or cpu related metrics.....

Stream processing : With both Network and Event now you have flow of events coming into the riemann. So definitely you are going to do something with that stream of events. We will write some rules for processing of the events. 

Clojure: The event processing rules in riemann we have to write as a Clojure script in riemann.config file.
Lets start with installation.

Riemann Installation

I will explain it in very brief as it is very simple!!!

1) Download riemann installer of your flavor(.deb, .rpm , .tar) from http://riemann.io/
2)Install it. For my case I just have to run the .deb file and its done, riemann installed.
3) Lets download some utility and dashboard for riemann. For that ruby will be needed.
    Run below commands to download dashboard and utility.
     - sudo apt install ruby
     -sudo gem install riemann-client riemann-tools riemann-dash

The installation part is done for riemann.

Starting riemann and riemann dashboarad

Lets start riemann and riemann-dash

1)  service riemann start  OR riemann OR riemann /etc/riemann/riemann.config
      You can start riemann using any one of the above commands.


So you can see that riemann server has started listening on port 5555. This is the default port configuration. You can override that settings from riemann.config file.

2) Run command: riemann-dash 


So riemann dashboard has started on port 4567, Lets open it in the browser.


Now press "Ctrl" and click on the area I have marked with red circle in the above image.
Once clicked , after that press "e" and you can see one popup window. Populate the values of that popup in the same way I did it in the below image.


"true" in query section means display all the streams coming into riemann.
Once you click on "Apply", you can see some system events being sent to riemann.


Now the next thing we are going to do is very important and interesting.

Riemann-Clients

We have riemann server up and running. Now we want to send our user defined events from our application to riemann for processing. In http://riemann.io/clients.html page you can see riemann has already client library present for C,C++,C#,Clojure,Elixir,Erlang,Go,Java,Lua,Node.js,OCaml,Perl,Python,Rubu,Scala and also supporting many other Tools, programs and plugins which can be integrated with riemann.

I am going to use riemann-java-client for this purpose and will send my own user defined events from my java program using the riemann java client library.

Pom file structure:
 <?xml version="1.0" encoding="UTF-8"?>  
 <project xmlns="http://maven.apache.org/POM/4.0.0"  
      xmlns:xsi="http://www.w3.org/2001/XMLSchema-instance"  
      xsi:schemaLocation="http://maven.apache.org/POM/4.0.0 http://maven.apache.org/xsd/maven-4.0.0.xsd">  
   <modelVersion>4.0.0</modelVersion>  
   <groupId>com.ali</groupId>  
   <artifactId>riemann</artifactId>  
   <version>1.0-SNAPSHOT</version>  
 <repositories>  
   <repository>  
     <id>clojars.org</id>  
     <url>http://clojars.org/repo</url>  
   </repository>  
 </repositories>  
   <dependencies>  
     <dependency>  
       <groupId>io.riemann</groupId>  
       <artifactId>riemann-java-client</artifactId>  
       <version>0.4.2</version>  
     </dependency>  
   </dependencies>  
 </project>  


Below example java class I have copied from riemann-java client git homepage only with some modifications.
 import io.riemann.riemann.client.RiemannClient;  
   
 import java.io.IOException;  
   
   
 public class BasicEventTest {  
   public static void main(String... args) throws IOException, InterruptedException {  
     RiemannClient c = RiemannClient.tcp("localhost", 5555); // creating connection object 
     c.connect();  // connecting to riemann server
     int temperature = 1;  
     while (true) {  
       if (temperature > 10) temperature = 1;  
       Thread.sleep(1000);  
       c.event().                // creating event
           service("fridge").  
           state("running").  
           metric(temperature++).  
           tags("appliance", "cold").  
           send().              // sending event
           deref(5000, java.util.concurrent.TimeUnit.MILLISECONDS);  
     }  
   }  
 }  
   

Let me explain what we are doing here:

1) creating riemann client which will connect to specified riemann server .
2) Creating event and giving service name, state, metric value, tags for extra metadata and sending it to riemann server.

Once you run this program , you can see the event on the riemann dashboard.

you can see that the temperature we are sending as a metric value is associated with service name "fridge". Once you click on the fridge service it will show more details associated with down below.
Here in our case value of temperature is changing every one second because we are sending new metric value every 1 second in our java program.
ttl value is 60 here so each event will be present in the riemann for 60 seconds only.  You can configure it in riemann.config file.
Remember this point as this will be the main point for need of Graphite  , In part2 I will explain need and benefit of graphite.

This service and metric was dummy. But you can think of any useful events and metrics inside your application and send them to riemann for processing.

Lets see one more example of Event sending from java application:
 import io.riemann.riemann.client.RiemannClient;  
   
 import java.io.IOException;  
 import java.lang.management.ManagementFactory;  
 import java.lang.management.MemoryMXBean;  
   
 public class BasicEventTest {  
   public static void main(String... args) throws IOException, InterruptedException {  
     RiemannClient c = RiemannClient.tcp("localhost", 5555);  
     c.connect();  
     while (true) {  
       Thread.sleep(1500);  
       MemoryMXBean memoryMXBean = ManagementFactory.getMemoryMXBean();  
       c.event().  
           service("jvm.nonheap.memory").  
           // state("running").   state is not needed here  
           metric(memoryMXBean.getNonHeapMemoryUsage().getUsed() / 1024).  
           tags("jvm nonheap used memory").  
           send().  
           deref(5000, java.util.concurrent.TimeUnit.MILLISECONDS);  
     }  
   }  
 }  
   

In this example we are sending JVM non heap used memory using Memory Mbean and sending its value to riemann.


Similarly we can send all jvm related metrics like jvm cpu, thread count ,heap memory usage etc...using Mbeans.

In this article we have discussed basic event sending from riemann client to riemann server and its basic display on riemann dashboard.

In part2 we will see riemann integration with Graphite and also discuss why it is needed.
In part3 we will see some advanced stream processing examples in riemann and some basic overview about Collected.

Below diagram depicts the architecture covered till now in this series.
After each article of this series I will update this diagram with newly learned things.


That's it for now...

part2 is my next article on this series.

Please post your comments and doubts!!!

Friday, 21 October 2016

Create and read PKCS #8 format private key in java program.

In this short article I will show you how to store private key in pkcs8 format in java and again read back the stored key in java.

PKCS #8 defines a standard syntax for storing private key information. There are 2 ways we can store private key in pkcs8 format.

1) unencrypted key
2) encrypted key

I will create both types of keys in java and store them in file. After that I will read them from file and create privatekey java object from stored file. We are using bouncy castle API for this program.

1) Create pkcs8 key

Code to create pkcs8 :
 import org.bouncycastle.openssl.PKCS8Generator;  
 import org.bouncycastle.openssl.jcajce.JcaPEMWriter;  
 import org.bouncycastle.openssl.jcajce.JcaPKCS8Generator;  
 import org.bouncycastle.openssl.jcajce.JceOpenSSLPKCS8EncryptorBuilder;  
 import org.bouncycastle.operator.OperatorCreationException;  
 import org.bouncycastle.operator.OutputEncryptor;  
 import org.bouncycastle.util.io.pem.PemObject;  
   
 import java.io.FileOutputStream;  
 import java.io.IOException;  
 import java.io.StringWriter;  
 import java.security.KeyPair;  
 import java.security.KeyPairGenerator;  
 import java.security.NoSuchAlgorithmException;  
 import java.security.SecureRandom;  
 import java.security.spec.InvalidKeySpecException;  
   
 public class App3 {  
   public static void main(String[] args) throws NoSuchAlgorithmException, IOException, OperatorCreationException, InvalidKeySpecException {  
   
     KeyPairGenerator kpGen = KeyPairGenerator.getInstance("RSA");  
     kpGen.initialize(2048, new SecureRandom());  
     KeyPair keyPair = kpGen.generateKeyPair();  
   
   
     //unencrypted form of PKCS#8 file  
     JcaPKCS8Generator gen1 = new JcaPKCS8Generator(keyPair.getPrivate(), null);  
     PemObject obj1 = gen1.generate();  
     StringWriter sw1 = new StringWriter();  
     try (JcaPEMWriter pw = new JcaPEMWriter(sw1)) {  
       pw.writeObject(obj1);  
     }  
     String pkcs8Key1 = sw1.toString();  
     FileOutputStream fos1 = new FileOutputStream("D:\\privatekey-unencrypted.pkcs8");  
     fos1.write(pkcs8Key1.getBytes());  
     fos1.flush();  
     fos1.close();  
   
     //encrypted form of PKCS#8 file  
     JceOpenSSLPKCS8EncryptorBuilder encryptorBuilder = new JceOpenSSLPKCS8EncryptorBuilder(PKCS8Generator.PBE_SHA1_RC2_128);  
     encryptorBuilder.setRandom(new SecureRandom());  
     encryptorBuilder.setPasssword("abcde".toCharArray()); // password  
     OutputEncryptor encryptor = encryptorBuilder.build();  
   
     JcaPKCS8Generator gen2 = new JcaPKCS8Generator(keyPair.getPrivate(), encryptor);  
     PemObject obj2 = gen2.generate();  
     StringWriter sw2 = new StringWriter();  
     try (JcaPEMWriter pw = new JcaPEMWriter(sw2)) {  
       pw.writeObject(obj2);  
     }  
     String pkcs8Key2 = sw2.toString();  
     FileOutputStream fos2 = new FileOutputStream("D:\\privatekey-encrypted.pkcs8");  
     fos2.write(pkcs8Key2.getBytes());  
     fos2.flush();  
     fos2.close();  
   }  
 }  


So you can see that for unencrypted key we do not provide any encryptor object which contains information about algorithm, password etc. While creating encrypted key we do provide that details.

As an outcome of this program we will have below 2 files in our file system:


Lets open them in notepad and check the difference.

encrypted key file:


unencrypted key file:


You can see the difference in start and end tag of both the files.

2) Read pkcs8 key

Code to read pkcs8:
 import org.bouncycastle.util.encoders.Base64;  
 import javax.crypto.EncryptedPrivateKeyInfo;  
 import javax.crypto.SecretKeyFactory;  
 import javax.crypto.spec.PBEKeySpec;  
 import java.io.IOException;  
 import java.nio.file.Files;  
 import java.nio.file.Paths;  
 import java.security.InvalidKeyException;  
 import java.security.KeyFactory;  
 import java.security.NoSuchAlgorithmException;  
 import java.security.PrivateKey;  
 import java.security.spec.InvalidKeySpecException;  
 import java.security.spec.PKCS8EncodedKeySpec;  
   
 public class App4 {  
   
   public static void main(String[] args) throws IOException, NoSuchAlgorithmException, InvalidKeySpecException, InvalidKeyException {  
   
     String encrypted = new String(Files.readAllBytes(Paths.get("D:\\privatekey-encrypted.pkcs8")));  
     String unencrypted = new String(Files.readAllBytes(Paths.get("D:\\privatekey-unencrypted.pkcs8")));  
   
     //Create object from unencrypted private key  
     unencrypted = unencrypted.replace("-----BEGIN PRIVATE KEY-----", "");  
     unencrypted = unencrypted.replace("-----END PRIVATE KEY-----", "");  
     byte[] encoded = Base64.decode(unencrypted);  
     PKCS8EncodedKeySpec kspec = new PKCS8EncodedKeySpec(encoded);  
     KeyFactory kf = KeyFactory.getInstance("RSA");  
     PrivateKey unencryptedPrivateKey = kf.generatePrivate(kspec);  
   
     //Create object from encrypted private key  
     encrypted = encrypted.replace("-----BEGIN ENCRYPTED PRIVATE KEY-----", "");  
     encrypted = encrypted.replace("-----END ENCRYPTED PRIVATE KEY-----", "");  
     EncryptedPrivateKeyInfo pkInfo = new EncryptedPrivateKeyInfo(Base64.decode(encrypted));  
     PBEKeySpec keySpec = new PBEKeySpec("abcde".toCharArray()); // password  
     SecretKeyFactory pbeKeyFactory = SecretKeyFactory.getInstance(pkInfo.getAlgName());  
     PKCS8EncodedKeySpec encodedKeySpec = pkInfo.getKeySpec(pbeKeyFactory.generateSecret(keySpec));  
     KeyFactory keyFactory = KeyFactory.getInstance("RSA");  
     PrivateKey encryptedPrivateKey = keyFactory.generatePrivate(encodedKeySpec);  
   
     //comparing both private key for equality  
     System.out.println(unencryptedPrivateKey.equals(encryptedPrivateKey));  
   }  
 }  


output:


So here you can after generating back the private key object from file we have compared them for equality and they returned true because they have been created from same private key and stored in file.

That's it for now...

Please post your comments and doubts!!!


Sunday, 16 October 2016

Create PKCS#7/P7B Format in java program.

In this short article I will show you how to create pkcs7 format file to store certificate or chain of certificate.

A pkcs7 format  has a file extention of .p7b or .p7c. It can only contains certificates and chain certificates, not the private key.

I will use 3 certificates I have created in previous article and store them in pkcs7 format.

Code:
 import sun.security.pkcs.ContentInfo;  
 import sun.security.pkcs.PKCS7;  
 import sun.security.pkcs.SignerInfo;  
 import sun.security.x509.AlgorithmId;  
 import sun.security.x509.X509CertImpl;  
 import java.io.FileInputStream;  
 import java.io.FileOutputStream;  
 import java.io.IOException;  
 import java.security.cert.CertificateException;  
 import java.security.cert.X509Certificate;  
   
 public class App2 {  
   
   public static void main(String[] args) throws IOException, CertificateException {  
     //loading certificates stored as file  
     FileInputStream rootCAFile = new FileInputStream("D:\\rootCA.cer");  
     FileInputStream intermedCAFile = new FileInputStream("D:\\intermedCA.cer");  
     FileInputStream endUserCertFile = new FileInputStream("D:\\endUserCert.cer");  
   
     //create certificate objects from fileinputstream  
     X509Certificate rootCA = new X509CertImpl(rootCAFile);  
     X509Certificate intermedCA = new X509CertImpl(intermedCAFile);  
     X509Certificate endUserCert = new X509CertImpl(endUserCertFile);  
   
     //create the certificate hierarchy array  
     X509Certificate[] chain = new X509Certificate[3];  
     chain[0] = endUserCert;  
     chain[1] = intermedCA;  
     chain[2] = rootCA;  
   
     //create pkcs7 object with the cert chain created  
     PKCS7 pkcs7 = new PKCS7(new AlgorithmId[0], new ContentInfo(ContentInfo.DATA_OID, null),  
         chain, new SignerInfo[0]);  
   
     // store it as .p7b or .p7c format file  
     FileOutputStream fos = new FileOutputStream("D:\\bundle.p7b");  
     pkcs7.encodeSignedData(fos);  
     fos.close();  
   }  
 }  


As an outcome you will have below file in your file system.


Lets open the file and check out the content.


So you can see that it has packaged all the certificates we have provided in the cert chain.

That's it for now...
Stay tuned for my next article related to pkcs8 format....

Please post your comments and doubts!!!